This blog post expects you to be familiar with the basic usage of ArgoCD. I will assume you are already familiar with the following topics:
You can demo almost this entire blog post! Go check out the ArgoCD Demo Repository.
GitOps
Since I will cover more advanced concepts of GitOps using ArgoCD I assume that you will already know what GitOps is. At the beginning of my DevOps career I thought that GitOps was just a buzzword to say: put everything under an SCM (most common is Git). Well, I was wrong that it is just a buzzword but I was partially right about the git part.
The truth is that GitOps follows four well-defined principles:
- Declarative approach: You must not do things manually. All changes must be done declaratively via a manifest file (usually
YAML). - All artifacts should be stored in a SCM system: Manifest must be versioned and stored in an SCM system (usually Git), which is considered the source of truth. A common practice is to have a repository only for storing these manifests (application code is placed in another repository).
- The GitOps operator constantly pulls changes from the artifacts repository: Desired state and manifests are pulled from the source of the truth repository.
- The GitOps operator runs a reconciliation loop: observe, diff, act: The goal is to always make sure that our system is in sync with the desired state stored under the SCM system.
This blog post will consider our GitOps infrastructure will be represented by: ArgoCD (our GitOps Operator) and the artifacts will be stored in GitHub.
App of Apps pattern
When going for the declarative setup of ArgoCD (which is something that I recommend you to do, instead of creating things manually - let's follow GitOps principles!) you can create a manifest for defining ArgoCD Applications. The ArgoCD Application will basically say "Hey ArgoCD, I have manifests for running a new app in a given format (e.g. Helm Chart, pure YAML files, Kustomize...) and they are stored under a given Git repository. Please install this application".
Some questions can show up:
Where this ArgoCD Application manifest will be stored?: Let's follow GitOps principles and store this under a Git repository.How ArgoCD will notice that I added this ArgoCD Application manifest and it will create my application?: By default, it won't be aware. We have two common options: apply the ArgoCD Application manually or let ArgoCD automatically apply this application.How can ArgoCD automatically apply the ArgoCD Application file?: Using the App of Apps pattern.
Imagine you want to create a new application and want it to be deployed in a Kubernetes cluster. Here is a summary of the steps that you probably will do:
- Create a pull request to add the ArgoCD Application manifest to the GitHub repository
- If approved by your team, merge the content to the master/main branch
- Connect to the Kubernetes cluster and apply the ArgoCD Application manifest (e.g.
kubectl apply -f my-application.yaml) and now ArgoCD is aware of the new application you want to install
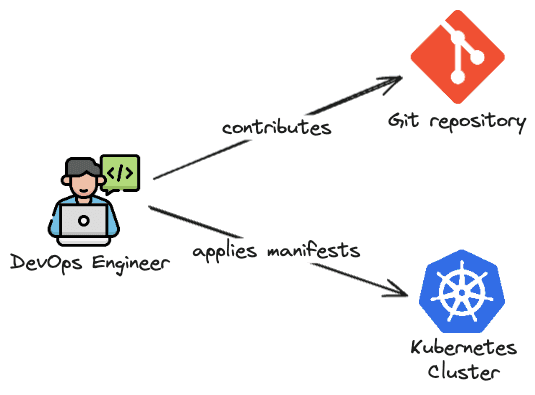
After that, ArgoCD will fetch the manifests (Helm, Kustomize, pure YAML...) to create your application (because you pointed out where they were in the ArgoCD Application manifest) and it will apply them to be deployed in the cluster.
There is nothing wrong with the above flow but we can improve it. The fact that we need to connect to the Kubernetes cluster and manually apply commands is prone to error. We can improve that and do that automatically. One way of solving this is to add all the needed steps in the CD pipeline but I'm not a big fan of that because you are allowing an external agent (e.g. GitHub Actions runner) to connect directly to your cluster and apply manifest there, you already have a GitOps Agent (ArgoCD) so why not use it? We can use the App of Apps pattern to dynamically create new applications in the cluster. So the workflow will be something like this:
- Create a pull request to add the ArgoCD Application manifest to the GitHub repository
- If approved by your team, merge the content to master/main branch
- App of Apps application will apply the new ArgoCD Application
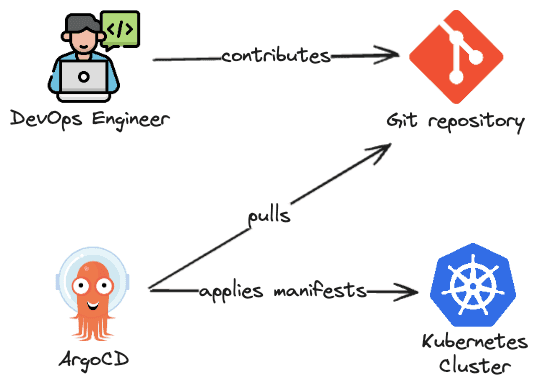
Notice that the App of Apps pattern simply uses the ArgoCD Application to point to a place that contains other ArgoCD Applications. And you can use that to also organize your ArgoCD deployment in groups. You can create an App of Apps for all the applications deployed by the data team/machine learning team/devops teams...
We still have a problem here: the chicken and the egg problem! Imagine a newly created cluster. I added the App of Apps manifest to the Git repository. Nothing is going to happen because this manifest was not applied to the cluster! This means that we need to apply once (or you can add this in a bootstrap pipeline) the app of apps application manifest. So the flow would be:
- Create the App of Apps ArgoCD Application
- Apply the manifest in the cluster (manually/CD/bootstrap pipeline)
- ArgoCD creates the ArgoCD Application (App of Apps application)
- All the following ArgoCD Applications that the App of Apps application is aware (the source) will be automatically applied by it
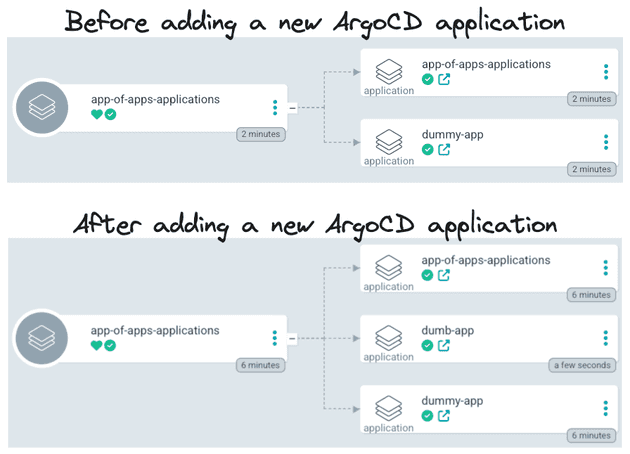
In the end, the App of Apps pattern is just an ArgoCD Application that points to ArgoCD Applications and it looks like this:
apiVersion: argoproj.io/v1alpha1
kind: Application
metadata:
  name: dev-app-of-apps-applications
  namespace: argocd
spec:
  destination:
    name: in-cluster
    namespace: argocd
  source:
    path: argocd/applications/dev
    repoURL: https://github.com/felipelaptrin/argocd-blog.git
    targetRevision: main
  project: default
  syncPolicy:
    automated:
      prune: true
      selfHeal: true
Some things to be aware of:
spec.source.repoURL: is the link to the Git repository (source of the truth).spec.source.path: is the path of the Git repository that the App of Apps Application will be "aware".spec.source.targetRevision: is the branch of the Git repository that the App of Apps Application should take into consideration.
And the ArgoCD Applications will look like this:
apiVersion: argoproj.io/v1alpha1
kind: Application
metadata:
  name: dev-dummy-app
  namespace: argocd
spec:
  destination:
    name: cluster-dev
    namespace: default
  source:
    path: apps/dummy
    repoURL: https://github.com/felipelaptrin/argocd-blog.git
    targetRevision: main
  project: default
  syncPolicy:
    automated:
      prune: true
      selfHeal: true
Multi-Cluster Management
Before deep diving into multi-cluster management, it's important to understand an important concept in ArgoCD called AppProject. The AppProject specifies where (which cluster and namespace) ArgoCD Applications inside this AppProject can be deployed. ArgoCD default installation comes with an AppProject called default that allows all applications in this group to be installed in any namespaces.
With that being said, imagine that we have a multi-environment infrastructure (dev, staging and production). We want to have completely isolated environments so each environment has its own Kubernetes Cluster. How can we use ArgoCD to help us deploy these applications in each environment? There are two very common solutions for that (none of these is better than the other, they will have pros and cons - there is no silver bullet!):
- Single ArgoCD per cluster: In this scenario every ArgoCD instance will deploy to its cluster, providing an extra layer of isolation but usually this will require more work time to manage.

- Multi-Cluster single ArgoCD: Here we have a single ArgoCD instance deploying to multiple Kubernetes clusters, leveraging features like SSO integration and RBAC. Ideally, you would have a separate cluster only for this ArgoCD (a completely separate control plane for managing this ArgoCD). But this is expensive and people usually use the production cluster to deploy this ArgoCD instance.
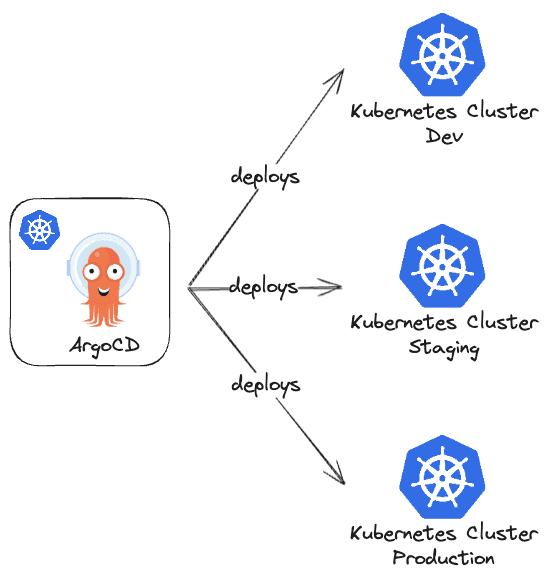
These are only two common configurations that we see DevOps Engineers doing. Of course, there are several other possible configurations (e.g. multiple ArgoCD instances that control multiple deployment clusters).
Managing external clusters
If we want to go for the single ArgoCD per cluster configuration we need to create some resources on the cluster that has ArgoCD installed and the external cluster (cluster that does not have ArgoCD installed and will be managed by ArgoCD).
On the external cluster we are going to:
- Create a
ServiceAccount
apiVersion: v1
kind: ServiceAccount
metadata:
  name: argocd-manager
  namespace: kube-system
secrets:
- name: argocd-manager-token- Create a
Secretof typekubernetes.io/service-account-tokenand link it with theServiceAccountcreated
apiVersion: v1
kind: Secret
type: kubernetes.io/service-account-token
metadata:
  annotations:
    kubernetes.io/service-account.name: argocd-manager
  name: argocd-manager-token
namespace: kube-system- Associate a
ClusterRolewith required ArgoCD permissions (you can usecluster-admininstead) using aClusterRoleBinding
apiVersion: rbac.authorization.k8s.io/v1
kind: ClusterRole
metadata:
  name: argocd-manager-role
rules:
- apiGroups:
  - '*'
  resources:
  - '*'
  verbs:
  - '*'
- nonResourceURLs:
  - '*'
  verbs:
  - '*'
---
apiVersion: rbac.authorization.k8s.io/v1
kind: ClusterRoleBinding
metadata:
  name: argocd-manager-role-binding
roleRef:
  apiGroup: rbac.authorization.k8s.io
  kind: ClusterRole
  name: argocd-manager-role
subjects:
- kind: ServiceAccount
  name: argocd-manager
  namespace: kube-system
When the secret gets created you can inspect its value (kubectl get secret argocd-manager-token -n kube-system -o yaml), because the cluster that contains ArgoCD installed will need to know the ca.crt and token value. Since these are secret values we will create a Secret and add the label argocd.argoproj.io/secret-type (with value cluster) on the management cluster, so ArgoCD will understand that this secret is related to an external cluster.
apiVersion: v1
kind: Secret
type: Opaque
metadata:
  labels:
    argocd.argoproj.io/secret-type: cluster
  name: cluster-dev
  namespace: argocd
stringData:
  config: |
    {
      "bearerToken": "eyJhbGciOiJSUzI1NiIsImtpZCI6InNJZlBrMXkxTkVpM1EtZzBKYmdsd0JldjBQZ1JBWktxQ1BmNHRjTmstMTQifQ.eyJpc3MiOiJrdWJlcm5ldGVzL3NlcnZpY2VhY2NvdW50Iiwia3ViZXJuZXRlcy5pby9zZXJ2aWNlYWNjb3VudC9uYW1lc3BhY2UiOiJrdWJlLXN5c3RlbSIsImt1YmVybmV0ZXMuaW8vc2VydmljZWFjY291bnQvc2VjcmV0Lm5hbWUiOiJhcmdvY2QtbWFuYWdlci10b2tlbiIsImt1YmVybmV0ZXMuaW8vc2VydmljZWFjY291bnQvc2VydmljZS1hY2NvdW50Lm5hbWUiOiJhcmdvY2QtbWFuYWdlciIsImt1YmVybmV0ZXMuaW8vc2VydmljZWFjY291bnQvc2VydmljZS1hY2NvdW50LnVpZCI6IjI2ZTc4NDBhLTg2M2UtNDE4YS1iNzZhLTk2YjE3YzhiYmQwYyIsInN1YiI6InN5c3RlbTpzZXJ2aWNlYWNjb3VudDprdWJlLXN5c3RlbTphcmdvY2QtbWFuYWdlciJ9.UcSVUwaTMf91V7S8p-8V1DCnXcDXodvtyeXeLkWEkTYQjtDk52SNJE2xofBQhNUVKLoIivSzX5mBcFpgS2V-iLOrqv-4Y9A47OBwXx-fNWkCifquz0c7hnqilGOYW6fI9X5PrmTL4-f6VVddmPX0vYbC-o-rf-G5HXbXJUgggTTZ7BKSHApRFNov8mX6RYxjMyVnNbYGHSIDnA8TtPpiibt13onOAZULnv-jDj23PVqtkk-RvxeqvtVNkyxxF4jpQzHF9uVIvOB-GDGj7iuDXZG-_CdTTar02dA9hLTpX6cn1gDhsq6iNGEMrLJtjZUKJJedyQHytG5QDu5H-VioCg",
      "tlsClientConfig": {
        "insecure":false,
        "caData":"LS0tLS1CRUdJTiBDRVJUSUZJQ0FURS0tLS0tCk1JSURCVENDQWUyZ0F3SUJBZ0lJYmYxMDRmNUZYLzB3RFFZSktvWklodmNOQVFFTEJRQXdGVEVUTUJFR0ExVUUKQXhNS2EzVmlaWEp1WlhSbGN6QWVGdzB5TkRBME1qTXlNRFUxTURkYUZ3MHpOREEwTWpFeU1UQXdNRGRhTUJVeApFekFSQmdOVkJBTVRDbXQxWW1WeWJtVjBaWE13Z2dFaU1BMEdDU3FHU0liM0RRRUJBUVVBQTRJQkR3QXdnZ0VLCkFvSUJBUUR5RmxvZjBSN0lIWUI1cWRBVGFhNnc0eXN2MlNwekdEdk5oM3I2UnluL1FhZEtvYkUrblF3Q3BVV1gKTHJ6NVNJYlYvSWlWUGV0WEliVjBVTktEdXRxaW0zajRzaDd4cUd6MmlQeU5JU1p6N3RqUGg5YXVkcVdvbzlFcQpQcWR2eXpHd1ZncDVCYytKaW1kTGlGOVFTSXVOMnFMMTAyUjdjVHNBZ2Q3QjcwWjVuWkhhVHd1eWw4QmNHVGw4ClFla0lyZTBUYm9ndGJzaGdWQkZxejMxM0hEaDJadExSYkEzN3VHZjY0NGdVdkNnWUpQQjV1cEZrcFN5dGZodUgKUG9TSkFTYkNablNRR1IrV1d3YzJuVVZPZ0plU3BWZTZRMks0eUR5azVqTWdEc2wzVVRwL0JSTDh6aXhMTXVjeApXTkFtOEo1RWdTOVJGK2VrcFFISFdVa05SeHRQQWdNQkFBR2pXVEJYTUE0R0ExVWREd0VCL3dRRUF3SUNwREFQCkJnTlZIUk1CQWY4RUJUQURBUUgvTUIwR0ExVWREZ1FXQkJTRWd3NnQ3akJ0VHpUWjhnU2xwTVpUaHJhc0xqQVYKQmdOVkhSRUVEakFNZ2dwcmRXSmxjbTVsZEdWek1BMEdDU3FHU0liM0RRRUJDd1VBQTRJQkFRQzlZcXUzRTdnOQpaZ2VkL3FTN052cmtGK05taUpKUXE3VStka3BuU0N1V3BiZVN5ZWZWaGZ6U1p6bE9sTFRsUFN0NFNnKzRqUnJRCjdrdDFsM0FHcEtJdHJob0sycUZWZktYZmMyc0RER2ovZEJTMFpUSGw5ZEJGVDNwZjMxSU9XQ1o4SFg3M080U0wKN0s1bXhIek1NYnRWbGZNZTlNckJUUVlMQzNFK0RoSy81RW80VkhCV1p2SnBDOTFlVWdSNTUyT1YwV2xtNmpTZQoyekRMc1hjVzhvQk43dytZNzYvNWUwVWJCSXpENUlEU3owZ1ZWa05od0trR3lXS3luWmljcG5kY2ltZE51SDhhCm9IQVptSEM3bytObk9weWV4dmJFcFEzRmZPa0wxODN3ckJORWo1T1dUOHFoakd2YmVSWW5RaER3MVQ2aHRFOGEKdWNKUG11UkFkK2VtCi0tLS0tRU5EIENFUlRJRklDQVRFLS0tLS0K"
      }
    }
  name: cluster-dev
  server: https://cluster-dev-control-plane:6443
Some points that I would like to comment on:
bearerToken: The value that is being used is the base64 decoded value of the output of thekubectl get secret argocd-manager-token -n kube-system -o yamlcommand.server: We are using two Kind clusters and since it works with docker under the hood I'm leveraging the fact that Kind creates a docker bridge network to run the clusters. That's why I can reference the dev cluster (the one that does not contain ArgoCD installed) by its name. In case you are still confused rundocker inspect cluster-dev-control-planeand check the network section.caData: That's the exact value ofca.crtfield returned by thekubectl get secret argocd-manager-token -n kube-system -o yamlcommand.
ApplicationSet
When using an ArgoCD Application we create a single deployment in a given cluster. What would happen if we have multiple Kubernetes clusters or different namespaces? We would have to create a single ArgoCD Application for each deployment, which can be repetitive and prone to error. In these cases, we can use an ApplicationSet.
An ApplicationSet automates the creation of multiple ArgoCD Applications at once using a template. The easiest way to comprehend this is to simply see the manifest:
apiVersion: argoproj.io/v1alpha1
kind: ApplicationSet
metadata:
  name: common
  namespace: argocd
spec:
  generators:
  - list:
      elements:
      - env: dev
        cluster: cluster-dev
      - env: prod
        cluster: in-cluster
  template:
    metadata:
      name: '{{env}}-common-app'
      namespace: argocd
    spec:
      project: default
      destination:
        name: '{{cluster}}'
        namespace: default
      source:
        path: apps/common
        repoURL: https://github.com/felipelaptrin/argocd-blog.git
        targetRevision: feat/generator
      syncPolicy:
        automated:
          prune: true
          selfHeal: true
Notice that the spec.template section is a templated ArgoCD Application that replaces the variables with the corresponding variable in the list of generators (spec.generators). There are several generators that you can use, such as list, git, cluster, matrix, merge, pull request... I don't think it's worth it to deep dive into all of them in this blog post, in case you need more info you can directly check in the documentation.
Releases Promotion
A golden rule of DevOps is to never deploy directly to production before testing this in other environments. It's likely to have more than one environment, such as dev, staging, qa, production... Different companies will have different environments, some will have only dev and prod, others dev, staging and prod, and so on. But the important thing to understand is that first we deploy to one environment, check how it goes and only after we validate we can deploy to the following environment.
How can we organize our repository (source of truth) to be a well-organized multi-environment GitOps repository? There are three common approaches to this question:
- Environment per folder: Each folder of the repository represents an environment, i.e. the
devfolder contains all the manifests related to the development environment and so on. This is a really good and highly recommended approach.

- Environment per repository: Each git repository represents a single environment. This is a more isolated scenario, especially when you only want a special group to be able to deploy in production. When using this approach, it's common to have only two repositories, one for non-production environments and another one for production environments (that only a special team can work with).
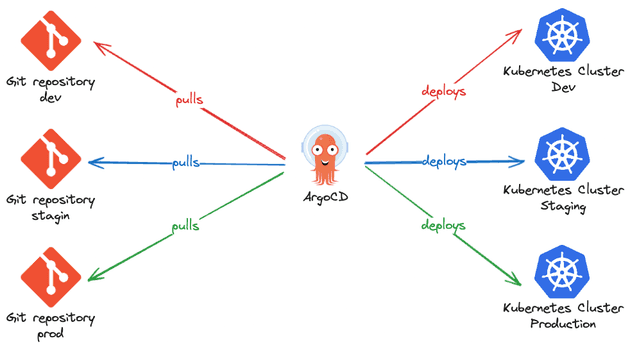
- Environment per branch: It's very similar to Git flow. Each branch corresponds to a given environment, i.e. the
developbranch deploys to the dev environment and so on. This is an approach that is NOT recommended. There are several problems using this approach such as: pull requests and merges between branches are painful and very problematic (git conflicts, unwanted changes, wrong order of changes...), having a large number of environments requires a lot of maintenance, it's easy to create environment-specific code, creating drifts between environments, this approach per branch goes against Kubernetes ecosystem (such as Helm/Kustomize).

Of course, some companies might use a combination of these approaches, but in general, these are the most commonly used ways to have a GitOps repository.
CI integration with GitOps
The CI (Continuous Integration) pipeline is usually responsible for linting, running tests, checking code coverage, building the docker image, push the docker image to a registry (such as DockerHub or EKS). How does this integrate with GitOps?
Remember one of the most important GitOps principles is that everything needs to be declaratively stored (commonly) in a Git repository. Our CI must then make modifications in our repository, i.e. committing changes. There are two common ways of achieving that: asynchronously (which is a pure GitOps way of doing it) and synchronously.
Async GitOps pipeline
Using an async GitOps pipeline means that ArgoCD Applications have auto-sync enabled, which means that if a change is detected in the manifests it will auto-apply this change (remember that the repository is considered the source of truth).
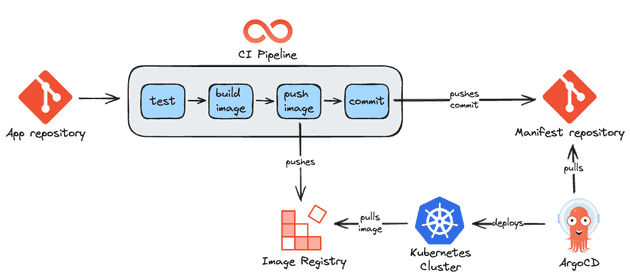
So here is the flow:
- Tests run to ensure code quality
- The docker image is created
- The docker image is pushed to the registry (e.g. Dockerhub, ECR)
- The new docker image tag is committed in the manifests repository
- ArgoCD detects that there is a change in the repository and will apply the changes in the application (remember that auto-sync needs to be enabled). Notice that this is an async event.
- Changes are applied in the Kubernetes cluster
- Kubernetes cluster pulls new docker image from registry
Sync GitOps pipeline
Some companies rather have a more synchronous approach, where developers can see the end-to-end process of deployment (because in the previous scenario, you would have to open ArgoCD to check if a new deployment was finished). This pipeline also allows us to perform actions after the deployment is done such as running smoke tests, sending a Slack message, and executing a script (this can also be achieved using ArgoCD Posy-Sync hooks/sync waves or a pipeline tool such as Argo Workflows - more on that later).
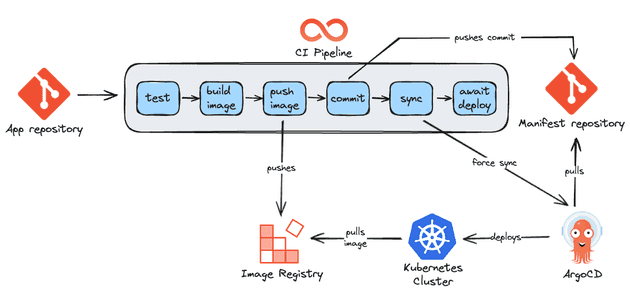
The flow is similar to the previous one but now we monitor and run commands in ArgoCD:
- Tests run to ensure code quality
- The docker image is created
- The docker image is pushed to the registry (e.g. Dockerhub, ECR)
- The new docker image is committed in the manifests repository
- Using ArgoCD CLI the CI forces the ArgoCD Application to sync (remember that auto-sync is disabled).
- Changes are applied in the Kubernetes cluster
- Kubernetes cluster pulls the new docker image from the registry
- We monitor the status of the ArgoCD Application until it gets healthy. If it doesn't get healthy the CI pipeline fails and the DevOps team needs to troubleshoot the error.
- Extra steps can be performed after a successful deployment (e.g. send a Slack message to the team to let them know that a new release was deployed).
ArgoCD Image Updater
The pipelines presented above are usually different from company to company depending on the needs of the company. Extra steps can exist and tools can change. A common example of that is to use special tools for updating the image tag of the applications such as ArgoCD Image Updater. Be aware that in the period that I'm writing this blog post (April 2024), this tool is still under active development, with possibly a lot of breaking changes from release to release and should be tested on non-critical environments.
ArgoCD Image Updater works by monitoring new image tags in the registry and committing the image tag change in the repository.

Some important things to know about this tool:
- It only works integrated with ArgoCD
- Your manifests need to be written using Kustomize or Helm Chart
- By default, the image updater will not manage the image update unless you explicitly tell him to do (configuring labels)
- You can specify image version constraints based on the application
Sync Operations
As we commented before, a common scenario is the need to run actions (e.g. database migration, sending email/message, running integration tests...) before and after the deployment. We can easily achieve this using Sync Phases and/or Sync Waves.
Hook Phases and Lifecycle
There are five (5) sync phases. They are executed in the following order:
- PreSync: Executed before syncing the ArgoCD Application.
- Sync: Executed at the same time as the ArgoCD Application sync.
- Skip: Tells ArgoCD to not apply the manifest.
- PostSync: Executed after the success (healthy state) of the sync operation.
- SyncFail: Executed after the failed sync operation.
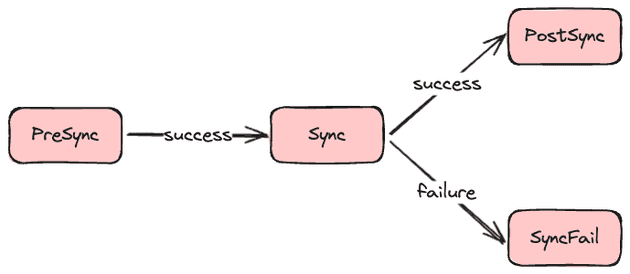
When configuring hooks we can define a deletion policy, i.e. when we want this hook to be deleted. The are three (3) deletion policies:
- HookSucceeded: The hook is deleted after the hook succeeded.
- HookFailed: The hook is deleted after the hook fails.
- BeforeHookCreation: Any existing hook resource is deleted before the new one is created.
There is nothing "special" with the hook, it's just a Kubernetes resource that will run in a given period (sync phase) and the lifecycle is controlled by ArgoCD. We configure all of this in the annotations of the resource (metadata.annotations). Let's check one example of a hook that runs before the sync (PreSync) and should be deleted (to not run again in the future) if it ran successfully:
apiVersion: batch/v1
kind: Job
metadata:
  generateName: database-migration
  annotations:
    argocd.argoproj.io/hook: PreSync
    argocd.argoproj.io/hook-delete-policy: HookSucceeded
One good thing about using the argocd.argoproj.io/hook-delete-policy annotation instead of using the ttlSecondsAfterFinished (Kubernetes Job field) is that if the resource is destroyed ArgoCD won't "complain" showing a drift!
Sync Waves
Sync waves allow us to modify the order in which the resources/hooks are applied. A wave is simply a number that defines when the resource should be applied (defined by the argocd.argoproj.io/sync-wave annotation). The wave is applied from the lowest value (you can even use negative numbers) to the highest value. By default, resources and hooks have wave set to zero (0). So using sync waves we can modify the order the resources/hooks will be applied.
We can combine sync waves and hooks to achieve maximum flexibility. Imagine the following scenario: we want to run a database migration and only after the migration is done we want to send a message to Slack saying the the deployment will start. In this case, we can set a sync wave value of the database migration job lower than the slack message job (e.g. -1 and 0 or 1 and 2). You can use sync phase annotations in most Kubernetes resources, but usually, they are assigned to Kubernetes Job and/or Argo Workflows.
ArgoCD uses the following order of precedence when applying the resources:
- Phase (i.e. PreSync phase happens before the Sync Phase)
- The sync wave (i.e. from lowest to highest value)
- By Kubernetes kind (e.g. namespace should be created first than other Kubernetes resources, followed by custom resources)
- By name
After the order is established ArgoCD will apply wave by wave in order. There is a delay between the sync of waves (default is 2 seconds) that can be configured by the ARGOCD_SYNC_WAVE_DELAY environment variable.
Let's give some examples so you understand exactly how ArgoCD orders theses resources. Imagine we want to deploy an ArgoCD Application with the following resources:
Job(Slack message before deployment): Wave set to -5.Job(database migration): Wave set to -10.Namespace: Wave default (0).Deployment(application): Wave default (0).Job(Slack message after deployment): Wave set to 5.
ArgoCD would first create the namespace (ArgoCD is smart enough to understand that namespace is required to be applied first because the following jobs will be deployed on this namespace), then run the database migration job, then Slack message, then deployment and finally the slack message after deployment.
We can have more flexibility using sync waves combined with sync phases:
Job(database migration): Presync wave set to 1.Job(Slack message before deployment): PreSync with wave set to 2.Namespace: Wave default (0).Deployment(application): Wave default (0).Job(Slack message after deployment): Posy Sync with default wave (0) - because the is no order job to run in this phase.
Below you can see the above example in a YouTube video. Pay attention to the order of execution. Also, notice that resources with hooks have an anchor symbol.
Sync Windows
Sync windows define the period that you want to enable/disable sync on applications/cluster/namespace. A common example is to block deployments/sync during the weekend, allow only deployments/syncs during weekdays, or allow only deployment during late night (e.g. 4AM) to not impact users.
When defining a sync window you need to specify when the sync window starts (cron expression), how long should it last, if it should allow or deny the sync operations, the timezone, if manual syncs are still allowed... In case of having more than one sync window, the deny has always preference.
Sync windows are defined on the project level (AppProject object). Check the example below.
apiVersion: argoproj.io/v1alpha1
kind: AppProject
metadata:
  name: default
spec:
  syncWindows:
  - kind: allow
    schedule: '10 1 * * *'
    duration: 1h
    applications:
    - '*-prod'
    manualSync: true
  - kind: deny
    schedule: '0 22 * * *'
    timeZone: "Europe/Amsterdam"
    duration: 1h
    namespaces:
    - default
  - kind: allow
    schedule: '0 23 * * *'
    duration: 1h
    clusters:
    - in-cluster
    - cluster1
The rules for sync windows are summarized below:

Cya!
I hope you liked this new blog post! ArgoCD is an amazing tool that allows us to achieve pure GitOps principles and it's extremely used in the DevOps world.
See you around! 👋
